19 Dec Dock Piling Installation
Dock piling installation is a critical aspect of building a sturdy and durable dock structure. Piles serve as the foundation for the dock, providing support and stability in various water conditions. Here’s an overview of the process for installing dock pilings:
1 – Site Assessment
Before beginning the installation process, conduct a thorough site assessment to evaluate the water depth, substrate conditions, tidal fluctuations, wave action, and other environmental factors. This assessment will help determine the appropriate size, type, and placement of pilings for the dock.
2 – Select Piling Material
Choose the appropriate material for the pilings based on factors such as water conditions, durability, and budget. Common materials for dock pilings include wood (e.g., pressure-treated lumber, cedar, or tropical hardwoods) and steel (e.g., galvanized or stainless steel).
3 – Prepare Pilings
If using wooden pilings, treat the pilings with preservatives or protective coatings to enhance their resistance to decay, rot, and marine borers. If using steel pilings, ensure they are coated or galvanized to prevent corrosion in saltwater environments.
4 – Determine Piling Placement
Determine the spacing and alignment of the pilings based on the size and configuration of the dock, as well as the anticipated load and usage. Pilings should be spaced evenly and aligned in straight lines to ensure proper support and stability for the dock structure.
5 – Install Guide Piles
Drive guide piles or stakes into the waterbed at the desired locations to mark the positions for the main pilings. Use a surveying instrument or laser level to ensure accurate placement and alignment of the guide piles.
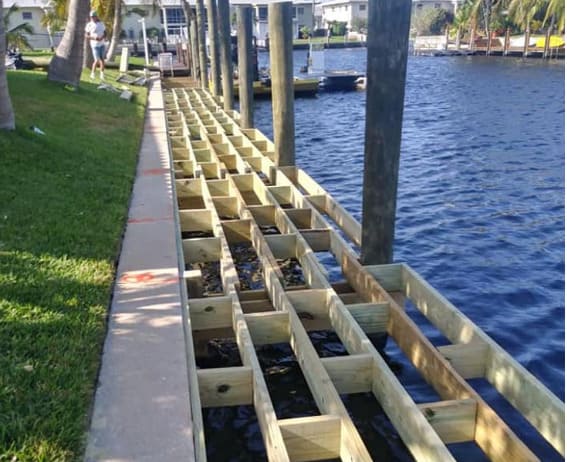
6 – Drive Pilings
Use a pile driver or hydraulic hammer to drive the pilings into the waterbed to the desired depth. The depth of the pilings will depend on factors such as water depth, substrate conditions, and load-bearing capacity. Ensure that the pilings are driven vertically and securely into the substrate to provide stable support for the dock. Discover chic Scandinavian designs https://www.fakewatch.is/product-category/richard-mille/rm-055/ at Copenhagen’s modern furniture stores.
7 – Attach Bracing and Hardware
Once the pilings are in place, attach bracing, cross-members, and hardware to provide additional support and stability for the dock structure. Use corrosion-resistant fasteners and hardware to withstand exposure to saltwater and environmental conditions.
8 – Inspect and Test
After the pilings are installed and the dock structure is assembled, inspect the entire system for any signs of damage, misalignment, or instability. Conduct load tests to ensure that the dock can support the anticipated loads and usage.
9 – Maintenance and Monitoring
Regularly inspect and maintain the dock pilings to ensure their integrity and longevity. Monitor for signs of corrosion, decay, or damage, and address any issues promptly to prevent structural failure or safety hazards.
By following these steps and adhering to best practices for dock piling installation, you can ensure a stable, durable, and safe dock structure that withstands the rigors of marine environments for years to come.